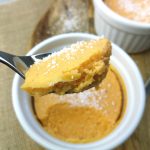
Sugar-Free Pumpkin and Coconut Pudding
Discover how to make a creamy, sugar-free pumpkin coconut pudding that’s healthy, satisfying, and perfect for any time of day.
Servings 4 portions
Calories 131kcal
Equipment
- Convection oven
- Blender
Ingredients
- 2 cup butternut squash
- 1/4 cup water
- 2 eggs
- 1/4 cup coconut milk
- 1/4 cup shredded coconut
- 1 pinch sea salt
- 1/2 vanilla bean
- 1 cinnamon stick
- 1 tsp coconut oil
- 1 tsp lemon juice
- 1 pinch ground cinnamon
Instructions
- Cook the pumpkin in a saucepan with the water, the cinnamon stick, and the vanilla bean. (You must slit the vanilla bean open and scrape out the seeds with a paring knife; add both the seeds and the pod to the pumpkin). Add the lemon juice.Cook for 20 minutes over low heat. It is best to keep it covered. If you think it needs more water, you can add a little bit more, but don't overdo it.
- Once the pumpkin is cooked, remove the vanilla bean and the cinnamon stick, then let it cool.
- Add the 2 eggs, shredded coconut, coconut milk, the pinch of salt, the cooked pumpkin, and the freshly ground cinnamon to your food processor. Blend until you achieve a smooth puree.
- Turn the oven on to 400ºF (200°C) and place a tray with water inside; preheat for 10 minutes.
- Grease the entire interior surface of 4 oven-safe individual molds with coconut oil. Divide the mixture among the molds.
- Once the oven is fully heated, place the molds into the water bath. Lower the oven temperature to 350ºF (180°C) and bake for 20-25 minutes. The exact time will depend on your oven; I usually turn on the convection (fan) setting. If you don't use the fan, you may need a few extra minutes.
- Once done, remove the tray from the oven and check each pudding with a toothpick to ensure it is cooked through. Remove the containers from the tray and let them cool to room temperature.
- Store the puddings in the refrigerator. Ideally, they should be well-chilled and allowed to rest for at least 2 hours before serving. To be honest, though, they are even better the next day.
- Serve the pudding in the same container it was baked in. You can sprinkle a little shredded coconut on top or serve it with a square of dark chocolate.
Notes
Notes
- Coconut milk can be substituted with heavy cream. I recommend reading labels and buying a cream that contains only one ingredient: cream. Many cooking creams contain carrageenan, an inflammatory substance that is not recommended; it is widely used in the food industry to improve texture, especially in dairy products.
- Coconut oil for greasing the molds can be replaced with butter. I want to emphasize using real butter, not margarine. Remember that margarine is not a whole food; it is an artificially created fat and is not healthy.
- I enjoy this pudding as it is, usually with a little shredded coconut sprinkled on top for decoration, but if you want to give it a special touch, you have more options. For example, whipped coconut cream* (if you avoid dairy) or whipped cream if you consume dairy regularly. You could also prepare a dark chocolate sauce or add some fruit, such as red berries.
Nutrition
Serving: 4units | Calories: 131kcal | Carbohydrates: 12g | Protein: 4g | Fat: 8g | Saturated Fat: 6g | Polyunsaturated Fat: 1g | Monounsaturated Fat: 1g | Trans Fat: 0.01g | Cholesterol: 82mg | Sodium: 61mg | Potassium: 332mg | Fiber: 2g | Sugar: 4g | Vitamin A: 7563IU | Vitamin C: 15mg | Calcium: 59mg | Iron: 2mg